WEBINAR | CWAN’s 2026 Outlook: Will the US Economy Hang On?
Join our economist Matthew Vegari, Head of Research at CWAN, as he challenges common assumptions about this unique business cycle.
Videos

In the first post of this series, we looked at why naive “just ask the AI to code” approaches feel unpredictable, and how clear collaboration rules and coding standards make AI behave more like a reliable junior developer than a creative guesser.
This post goes beyond vibe coding and shows practical ways to work with AI coding agents to produce better-engineered software products in real projects.
As a senior engineer, you still own design, requirements, and architectural decisions. AI is most effective when you use chat to explore design options and clarify incomplete requirements, then capture the agreed plan in markdown. From there, you validate each step with incremental changes and tests to prevent regressions so progress stays both transparent and correct. The practical question becomes:
How do you make AI’s plan visible, keep it aligned with your design, and ensure tests and documentation stay integrated into your day-to-day workflow?
We’ll focus on three levers you control directly:
By the end, you’ll have a practical playbook for working with AI coding agents: how to turn vague tickets into clear feature definitions and visible markdown TODO lists, structure work as small reviewed commits, and use testing-as-you-go to prevent regressions. You’ll also see how to visualize architecture with lightweight diagrams so design, implementation, and tests stay aligned as the codebase evolves.
Most AI coding tools do a surprising amount of planning that you never see.
They break problems into subtasks, choose an order of operations, and quietly maintain their own internal “todo list” as they work. Even when they show you a few bullet points in the chat window, that’s only a thin slice of the actual reasoning happening in the background.
That creates three problems:
If you’ve ever had an AI “helpfully” tweak a few extra lines of code or string content you didn’t mention, you’ve already met this hidden plan. Somewhere, a little invisible project manager decided those changes were part of the sprint—it just forgot to loop you in.
Anthropic’s Claude Code agent exposes this hidden planning explicitly through an optional plan mode for larger tasks. Instead of diving straight into edits, it first generates a step-by-step plan you can review and adjust, then executes against that plan.
If you’re using Claude Code, it’s worth experimenting with plan mode whenever you ask for non-trivial changes (new features, refactors, multi-file edits). You still want the final plan written into your feature markdown file, but plan mode can give you a clearer starting point and make it easier to catch misunderstandings before code changes happen.
For humans, keeping the whole plan in your head leads to forgotten requirements and missed steps. AI runs into the same problem when the real plan only lives in its own working memory or a single session—you have less opportunity to review or correct it before code changes start.
The fix is moving the plan out of the AI’s head and into shared, persistent artifacts—markdown files, checklists, and test plans that live next to your code.
Team project management tools already do their job well.
What they don’t give you is a step-by-step execution plan for how one engineer and one AI assistant will actually build a specific feature.
That’s where personal TODOs come in.
When you drop a Jira story directly into an AI chat and say “implement this,” you’re asking the AI to invent that execution plan in its own private memory. Instead, you want to:
When you paste a ticket’s requirements into an AI coding agent, don’t stop at “understood.” Ask it to identify what’s unclear, list assumptions it would otherwise make, and propose follow-up questions. Iterate on that dialog until you both have a shared, concrete understanding. From there, you can work together to turn the clarified requirements into a step-by-step plan in a feature markdown file.
You don’t stop using Jira or your existing processes. You add a layer underneath them: per-feature TODOs and checklists that make the AI’s plan transparent and controllable.

The key insight: you and AI work together to turn requirements into an explicit implementation plan. That plan becomes the shared artifact you both execute against.
In the next section, we’ll put those TODOs into feature markdown files so both you and the AI are always working from the same shared plan.
Once you’ve used chat to clarify the requirements for a feature, you need a place to capture:
A feature markdown file is the natural home for all of that.
A typical flow looks like this:
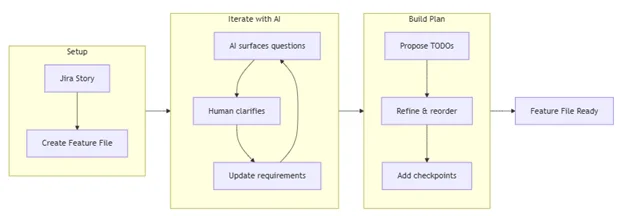
Here’s the kind of prompt you might give the AI:
Create a feature file
`docs/features/feature-101.md` for this feature.
Here’s the Jira story to seed your understanding:
[paste story details]Structure the file with these sections:
- **Requirements** – restate the story in your own words and list open questions.
- **Implementation Plan** – `[ ]` checkbox TODOs for tracking progress.
- **Implementation Workflow** – the steps you should follow for each TODO (for example: show which files you plan to change, explain your approach, wait for my approval, then run or update tests).
- **Checkpoints** – where we should pause and validate behavior.
- **Test Plan** – initial list of tests we’ll need (we’ll refine using TEST-PATTERNS.md later).
This will be an interactive process: start by asking what requirements need clarification, then iterate as you propose and refine the TODO list and testing checkpoints based on my answers.
You’re not asking the AI to disappear and “handle it.” You’re asking it to build the working surface you’ll both use.
Once you have the feature file and initial TODOs:
For example:
“Let’s work on the next TODO in docs/features/feature-101.md.”
As you and the AI complete work:
There’s also a small but real benefit: humans get the satisfaction of checking boxes, and AI tools get a clearer definition of “done” than a vague “keep going” in chat.
Consider committing code after each meaningful TODO is completed. Small, reviewed commits make it easier to see exactly what the AI changed, spot unintended edits, and connect each change back to a specific checkbox in your feature file.
In the rest of this post, we’ll keep using this feature-file idea as the hub. We’ll plug in:
Transparent incremental steps lead to less developer frustration and more architecturally sound, testable code.
If feature files are the hub, markdown is the road surface everything runs on.
Markdown hits a sweet spot:
In practice, a feature file might include:
- ## Requirements – restated story, edge cases, and clarifications.
- ## Implementation Plan – the checkbox TODOs you and the AI are working through.
- ## Implementation Workflow – agreed steps the AI should follow for each TODO.
- ## Test Plan – initial unit, integration, and E2E test ideas.
- ## Design & Diagrams – Mermaid diagrams for flow, architecture, or sequences.
- ## Decisions – tradeoffs you made and why.
- ## Open Questions – unresolved items to revisit.
Over time, this file becomes the single story of the feature—from problem to design to tests and implementation. AI isn’t just responding to whatever you said in the last prompt; it’s working inside a stable context that you can edit and refine.
# Feature 101 – Short, descriptive title
## Requirements
– Restated story in your own words
– Edge cases and constraints
– Open questions to resolve
## Implementation Plan
– [ ] Step 1 – small, concrete change
– [ ] Step 2 – next change
– [ ] Step 3 – follow-up work
## Implementation Workflow
For each TODO above, the AI should:
1. Show which files it plans to change.
2. Explain the approach.
3. Wait for approval.
4. Apply the change.
5. Run or update tests.
## Test Plan
– Unit tests: what behaviors will be covered– Integration/E2E tests: which workflows should be verified
## Design & Diagrams
– Mermaid diagrams for data flow, component relationships, or sequences
## Decisions
– Key tradeoffs and why they were chosen
## Open Questions
– Items that still need clarification or follow-up
In Blog 1, we said: “Markdown is the language AI speaks.” In this post, we’re putting that into practice. You’re not just pasting prompts into chat; you’re curating a set of markdown documents—feature files, coding standards, testing patterns—that define how AI collaborates with your team.
Because the feature file captures requirements, TODOs, test plans, and decisions, AI can also use it to draft merge request descriptions. Instead of trying to remember everything that changed, you can ask the AI to summarize docs/features/feature-101.md into a concise GitLab MR description that explains the intent, key changes, tests added or updated, and any known follow-ups.
Your feature file’s test plan describes what you’ll test for a specific change. A TEST-PATTERNS.md document describes how your team writes tests in general: mocking strategy, file and naming patterns, unit vs integration strategy, coverage expectations, and any tool- or framework-specific guidance (for example, that you use Jest or prefer MSW for API mocking).
Without this kind of shared reference, AI focuses on test metrics instead of writing high-value tests that protect customer experience. It’s easy for it to generate:
The metrics can say 100% code coverage while your gut says 0% confidence that the code actually works.
A TEST-PATTERNS.md document gives AI a testing knowledge base it can use to build consistent test scaffolding:
AI needs clear rules about where tests go and how to organize them. Without this, tests end up scattered and inconsistent.
## Test Organization Guidelines
– **Unit tests** – test individual components/functions in isolation.
– **Integration tests** – test how components work together.
– **Test location** – say whether tests live side-by-side with code or in a `__tests__` directory.
— e.g., `Component.tsx` and `Component.test.tsx` in the same folder.
– **File naming** – define consistent patterns that make tests easy to find.
– **Test grouping** – keep related tests organized together logically.
You don’t have to adopt a particular layout, but you should give AI clear project-level patterns so tests stay consistent and easy to discover for both humans and tools.
Example file structure (one possible pattern):
src/components/ComponentName/
├── Component.tsx
├── Component.test.tsx # Unit tests with mocked dependencies
└── Component.msw.test.tsx # Integration tests with MSW (if you use it)
One powerful way to do this is to include project-level code patterns directly in TEST-PATTERNS.md so AI can copy them when generating new tests.
Example integration test with MSW (if your project uses it):
describe(‘Component with API’, () => {
beforeAll(() => server.listen())
afterEach(() => server.resetHandlers())
afterAll(() => server.close())
it(‘loads and displays data’, async () => {
render(<Component />)
await screen.findByText(‘loaded data’)
})
})
By giving AI a concrete pattern like this, you’re not just telling it “use MSW”—you’re showing exactly how MSW tests should look in your project so it can generate consistent scaffolding.
Using consistent structure and examples keeps tests uniform and cohesive across the project. It gives AI (and humans) a better chance of understanding existing patterns, finding tests that already exist, and implementing new tests in the right place.
Most AI coding tools learn how to write tests by analyzing your existing code and documentation. They infer patterns: where tests live, how they’re named, what they assert. A TEST-PATTERNS.md file makes it much more likely that those inferred patterns match what you actually want.
Out of the box, many tools can generate unit, functional, and basic regression tests on their own. Where they often need more guidance is choosing the right boundaries for API and integration testing. AI thrives on structured tasks and defined success criteria; without that structure, it’s easy for it to treat “more coverage” as the primary goal instead of writing tests that exercise meaningful behavior.
A mocking philosophy section in TEST-PATTERNS.md gives the AI a concrete target:
## Mocking Guidelines
– **Mock external dependencies** – APIs, third‑party services, file system, database.
– **Don’t mock what you’re validating** – keep the component or function under test real.
– **Mock at the boundary** – intercept network calls and infrastructure, not domain logic.
– **Keep mocks simple** – return predictable data; avoid re‑implementing business rules in mocks.
– **Test behavior, not implementation** – assert outcomes that matter to users or callers.
Instead of inventing its own approach, the assistant can align test generation with these rules.
// ✅ DO: Mock external API hooks or clients
jest.mock(‘@services/api’, () => ({
useGetDataQuery: jest.fn(),
useUpdateDataMutation: jest.fn(),
}))
// ❌ DON’T: Mock the code you’re trying to validate
jest.mock(‘./Component’, () => ({
internalHelper: jest.fn(),
}))
In your feature file or prompts, you can tie this together:
“When adding or updating tests for this feature, follow the Mocking Guidelines section in docs/TEST-PATTERNS.md.
Mock only external boundaries like network calls or storage; keep the component or function under test real, and focus assertions on observable behavior.”
That combination—clear test patterns plus explicit prompts—helps the AI aim coverage at the layers you care about instead of just increasing the number of tests.
Given just a codebase, many AI tools will happily generate more tests. What they don’t automatically know is which behaviors actually matter: which flows are riskier, which edge cases are important, and which parts of the system are already covered.
A Testing Approach section in TEST-PATTERNS.md gives the assistant a checklist for where to look and what to prioritize when proposing or adding tests:
Testing Approach
– **Start from behavior** – derive tests from user stories, feature files, and public APIs.
– **Test public interfaces** – functions, components, and endpoints that external callers use.
– **Test expected outcomes** – returned values, state changes, rendered output, or side effects that matter.
– **Cover edge cases** – invalid inputs, error conditions, and boundary scenarios called out in requirements.
– **Avoid implementation testing** – don’t assert on private helpers, internal state, or specific hook usage.
– **Prefer fewer, meaningful tests** – focus on scenarios that would hurt users if they broke.
You can then point the AI at both your feature file and this section when asking for tests:
“For this feature, read docs/features/feature-101.md and the Testing Approach section in docs/TEST-PATTERNS.md.
Propose tests that cover the main workflows and edge cases described there, focusing on public interfaces and observable behavior.”
Example:
// ✅ DO: Test behavior and outcomes
it(‘shows a loading indicator while data is fetching’, () => {
mockQuery.mockReturnValue({ isLoading: true, data: null,
error: null })
render()
expect(screen.getByTestId(‘loading-spinner’)).toBeInTheDocument()
})
// ❌ DON’T: Test internal implementation details
it(‘calls useReportQuery hook three times’, () => {
const spy = jest.spyOn(apiHooks, ‘useReportQuery’)
render()
expect(spy).toHaveBeenCalledTimes(3) // fragile and tied to implementation
})
By combining:
you give the AI a much clearer target, so its proposed tests are more likely to follow your intended patterns and focus on behavior that matters.
The same software engineering principles that guide your coding standards should also guide your tests. Clear intent, single responsibility, and reliable behavior matter just as much in the test suite as they do in production code.
You can capture those expectations directly in TEST-PATTERNS.md so they become part of the context AI sees when it generates or updates tests:
## Quality Standards
– **Clear test names** – describe the behavior being verified in plain language.
– **Single responsibility** – each test should verify one specific behavior or scenario.
– **Reliable assertions** – tests should fail when behavior breaks, and pass when it works.
– **Independent tests** – avoid coupling tests to each other or to run order.
– **Quality threshold** – define a minimum standard (for example, coverage or critical paths) so tests focus on the areas that matter most.
Providing these test pattern prompts will give context to the AI to follow in how to write the tests:
“When adding or updating tests, follow the Quality Standards section in docs/TEST-PATTERNS.md. Favor clear names, single responsibility, reliable assertions, and independence between tests.”
That way, the assistant is working from the same quality bar you would apply if you were writing the tests by hand.
Modern AI tools often include some form of memory—a way to remember preferences, patterns, or past work across sessions. In Windsurf, for example, memories persist within a workspace and can be created automatically by the assistant or explicitly by the user.
That’s powerful, but there are important limits: in current tools, memories are usually tied to a single developer and workspace or project, they only capture slices of past context, and they can drift out of sync with the real codebase over time.
Within a single developer’s workspace, memory can help with:
Under the hood, tools usually:
For team collaboration, memory has real limitations:
That’s why the core, team-wide rules still belong in versioned markdown documents in the repo, such as:
Both Windsurf and Claude Code support persistent context, but they do it in different ways.
Windsurf (Cascade Memories and Rules)
Claude Code (File-Based Project Memories)
Both approaches reinforce the same theme: use the tool’s memory features as a convenience layer, but keep the durable rules and patterns in human-readable, versioned markdown that your team controls.
Tool memories are great at accumulating fragments of recent work—what you’ve been doing in this workspace or project—but they don’t automatically give you a complete architectural picture.
A practical split looks like this:
Many teams find it useful to add an ARCHITECTURE.md at the root of the repo to capture high-level system design, key flows, and major dependencies in one place that both humans and AI can reference.
And in daily work:
Feature requirements docs don’t have to be permanent artifacts; many teams keep them in lowercase files scoped to a single feature or ticket and clean them up once the work is complete.
When you describe patterns, processes, designs, and feature requirements in markdown, you give AI a consistent, shareable context that works across tools and across the whole team—not just within one person’s memory for a single session.
Architecture diagrams are one of the fastest ways to align humans and AI on how a system works—or how it should work.
The good news is that AI is surprisingly good at turning code into diagrams and using diagrams as design input to guide code changes. Once again, markdown is the medium.
When you point AI at a feature or subsystem and ask for diagrams, you’re asking it to:
Helpful prompts include:
The assistant can respond with Mermaid diagrams like:
Use cases:
If you’re using VS Code, installing a markdown preview extension that supports Mermaid (such as Markdown Preview Enhanced) lets you render these diagrams directly from your feature files.
Diagrams also help before and during implementation:
You might ask:
Fifteen minutes of diagramming with AI—grounded in your code and feature files—can save hours of review time and misunderstandings later.
In the first post of this series, we focused on why naive AI usage fails and how to reset expectations by treating AI as a junior developer operating inside clear working agreements and coding standards.
In this post, we turned that philosophy into a concrete workflow for senior engineers:
A chat‑only workflow makes every feature feel like a new conversation; a markdown‑anchored workflow makes it feel like you and the AI are picking up the same notebook every time.
A simple end-to-end flow might look like this:
These techniques optimize AI collaboration across the complete development lifecycle—architecture design, implementation, testing, documentation, and workflow optimization—while keeping you in the senior engineer role. Markdown is the language AI speaks; using it intentionally turns AI from an unpredictable partner into a reliable implementer working inside your standards and design.
The difference is simple: less vibe, more engineering.
Eric Christianson is a Staff Software Engineer at Clearwater Analytics (CWAN) with over 30 years of experience developing innovative technology solutions for leading companies. He focuses on creating user-friendly experiences and fostering collaboration across teams to solve complex challenges. Eric is currently leading efforts to build customer-facing applications developed with AI coding agents and providing AI-assisted workflows.